Sau bài học hello world với socket io thì ta sẽ tiếp tục đi tiếp phần event handling và error handling, anh em gồng lên nào :D
Event Handling
Socket thì hoạt động chủ yếu dựa trên event, có một số event riêng biệt, một số thì có thể được truy cập ở phía server. Danh sách được list ra bên dưới đây cho anh em
- Connect
- Message
- Disconnect
- Reconnect
- Ping
- Join và
- Leave
Phía client-side thì có một số event khác như
- Connect
- Connect_error
- Connect_timeout
- Reconnect, ...
Trong ví dụ helloworld, chúng ta sử dụng event kết nối(connection) và ngắt kết nối(disconnection) để log lại khi user kết nối và chuồn mất. Bây giờ chúng ta có thể sử dụng message event để gửi message từ server về client. Để làm được điều này thì cần modify io.on ('connection', function(socket)) theo đoạn code sau
Ta có lưu ý nhỏ là hàm sendfile không còn được hỗ trợ nữa, mà thay vào đó là dùng sendFile, để dùng hàm này thì cần phải có thêm dirname như sau
res.sendFile(__dirname + '/index.html');
var app = require('express')();
var http = require('http').Server(app);
var io = require('socket.io')(http);

app.get('/', function(req, res) {
   res.sendFile(__dirname + '/index.html');
});

io.on('connection', function(socket) {
   console.log('A user connected');

   //Gui message sau thoi gian timeout 4 giay
   setTimeout(function() {
      socket.send('Sent a message 4seconds after connection!');
   }, 4000);

   socket.on('disconnect', function () {
      console.log('A user disconnected');
   });
});

http.listen(3000, function() {
   console.log('listening on *:3000');
});
Nó sẽ gửi event gọi message(built in) tới client sau 4s khi đã kết nối. Hàm send này tương ứng với 'message' event.
Sau đó ta cần handle event ở client. Sửa file index.html thêm vào đoạn code sau ở dưới cùng.
<script>
var socket = io();
socket.on('message', function(data){document.write(data)});
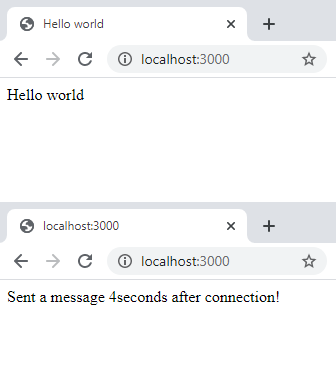
</script>Giờ thì ta đã handle được 'message' event ở client. Khi bạn vào page trong browser thì nó sẽ có hình như sau, hình đầu là mới kết nối, hình sau là kết nối sau 4s
Lưu ý:Ở đây chúng ta đang gửi string, tất nhiên là bạn có thể gửi object ở bất kỳ event nào.
Message là built-in event được cung cấp bởi API, nhưng trong ứng dụng thực thế có thể sẽ được ít sử dụng, do đó chúng ta cần có khả năng để phân biệt các event.
Để thực hiện điều này thì Socket.IO cung cấp cho chúng ta khả năng có thể custom events. Ban có thể tạo nó bằng cách sử dụng socket.emit function.
Ví dụ, đoạn code emit dưới đây sẽ gọi event testerEvent
var app = require('express')();
var http = require('http').Server(app);
var io = require('socket.io')(http);

app.get('/', function(req, res) {
   res.sendFile(__dirname + '/index.html');
});

io.on('connection', function(socket) {
   console.log('A user connected');

   //Send a message when
   setTimeout(function() {
      //Sending an object when emmiting an event
      socket.emit('testerEvent', { description: 'A custom event named testerEvent!'});
   }, 4000);

   socket.on('disconnect', function () {
      console.log('A user disconnected');
   });
});

http.listen(3000, function() {
   console.log('listening on localhost:3000');
});
Để handle các event custom trên client thì chúng ta cần có listener lắng nghe các event của testerEvent. Đoạn code sau sẽ handle event trên client, trên file index.html nha anh em
<!DOCTYPE html>
<html>
   <head>
      <title>Hello world</title>
   </head>
   <script src = "/socket.io/socket.io.js"></script>

   <script>
      var socket = io();
      socket.on('testerEvent', function(data){document.write(data.description)});
   </script>
   <body>Hello world</body>
</html>
Nó sẽ hoạt động giống với ví dụ bên trên, tuy nhiên trong trường hợp này event là testerEvent. Ta mở browser và vào lại localhost:3000 bạn sẽ thấy
Hello worldSau 4s sẽ là
A custom event named testerEvent!Bạn cũng có thể phát đi(emit) event từ client. Để làm được điều này ta dùng function emit trong socket object. Sửa file index.html
<!DOCTYPE html>
<html>
   <head>
      <title>Hello world</title>
   </head>
   <script src = "/socket.io/socket.io.js"></script>

   <script>
      var socket = io();
      socket.emit('clientEvent', 'Sent an event from the client!');
   </script>
   <body>Hello world</body>
</html>
Để handle những event này ta dùng on function trên server của bạn. Sửa file app.js
var app = require('express')();
var http = require('http').Server(app);
var io = require('socket.io')(http);

app.get('/', function(req, res) {
   res.sendFile(__dirname + '/index.html');
});

io.on('connection', function(socket) {
   socket.on('clientEvent', function(data) {
      console.log(data);
   });
});

http.listen(3000, function() {
   console.log('listening on localhost:3000');
});
Comeback lại browser ấn f5 cho load lại localhost:3000 thôi anh em. Sau đó check log lại của server
listening on localhost:3000
Sent an event from the client!
Error Handling
Tiện có Event thì tiếp luôn cái Error Handling vào một chỗ luôn. Trong trường hợp có các lỗi liên quan tới kết nối, timeout,.. thì việc handle các lỗi này là cực kỳ quan trọng. Để handle connection error ở phía client thì có các API sau
- Connect − Khi client kết nối thành công.
- Connecting − Khi client đang thực hiện kết nối.
- Disconnect − Khi client mất kết nối.
- Connect_failed − Khi client kết nối server fail.
- Error − Khi có lỗi event được gửi từ server.
- Message − Khi server gửi message sử dụng hàm send.
- Reconnect − Khi kết nối tới server thành công.
- Reconnecting − Khi client đang trong quá trình kết nối.
- Reconnect_failed − Khi kết nối fail.
Để handle được error thì chúng ta có thể handle những event này sử dụng các object out-socket được tạo trên client.
Ví dụ nếu chúng ta có kết nối fail, thì dùng đoạn code sau để thông báo kết nối server lại
socket.on('connect_failed', function() {
   document.write("Sorry, there seems to be an issue with the connection!");
})
Chương trình cho anh em tham khảo
 hocarm
Kết
Vậy là xong phần 2 cho anh em, cơ bản ta đã biết được Event Handling, cách custom event với emit và sử dụng Error Handling để kiểm tra các thông tin về connection rồi. Mời anh em nghỉ ngơi ăn cơm uống nước ta còn qua phần 3

