Vậy là cũng đã đi tới bài cuối của socketIO, trong bài này sẽ là làm một ứng dụng chat với SocketIO và tìm hiểu thêm một chút về cách debug và log chương trình
Ứng dụng chat
Với ứng dụng chat này ta có thể sử dụng nó để chat với nhiều room chat khác nhau. Ta sẽ cho phép user chọn username và cho phép họ chat với tên đó. Đầu tiên sẽ là điều chỉnh file html để request người dùng nhập thông tin vào
<!DOCTYPE html>
<html>
   <head>
      <title>Hello world</title>
   </head>
   <script src = "/socket.io/socket.io.js"></script>

   <script>
      var socket = io();
   </script>
   <body>
      <input type = "text" name = "name" value = "" placeholder = "Enter your name!">
      <button type = "button" name = "button">Let me chat!</button>
   </body>
</html>
Tiếp theo là tạo server để chấp nhận các connection từ client. Cho phpes người dùng chọn username bằng event setUsername. Nếu người dùng tồn tại, chúng ta sẽ phản hồi bằng event userExists , ngược lại sẽ là event userSet.
var app = require('express')();
var http = require('http').Server(app);
var io = require('socket.io')(http);

app.get('/', function(req, res) {
   res.sendFile(__dirname + '/index.html');
});

users = [];
io.on('connection', function(socket) {
   console.log('A user connected');
   socket.on('setUsername', function(data) {
      if(users.indexOf(data) > -1) {
         users.push(data);
         socket.emit('userSet', {username: data});
      } else {
         socket.emit('userExists', data + ' username is taken! Try some other username.');
      }
   })
});

http.listen(3000, function() {
   console.log('listening on localhost:3000');
});
Tiếp tục điều chỉnh lại index.html một chút xíu để gửi username tới server khi người dùng click vào nút, nếu user tồn tại thì sẽ show ra lỗi, ngược lại thì sẽ show ra thông tin đã được chat lên
<!DOCTYPE html>
<html>
   <head>
      <title>Hello world</title>
   </head>

   <script src = "/socket.io/socket.io.js"></script>
   <script>
      var socket = io();
      function setUsername() {
         socket.emit('setUsername', document.getElementById('name').value);
      };
      var user;
      socket.on('userExists', function(data) {
         document.getElementById('error-container').innerHTML = data;
      });
      socket.on('userSet', function(data) {
         user = data.username;
         document.body.innerHTML = '<input type = "text" id = "message">\
         <button type = "button" name = "button" onclick = "sendMessage()">Send</button>\
         <div id = "message-container"></div>';
      });
      function sendMessage() {
         var msg = document.getElementById('message').value;
         if(msg) {
            socket.emit('msg', {message: msg, user: user});
         }
      }
      socket.on('newmsg', function(data) {
         if(user) {
            document.getElementById('message-container').innerHTML += '<div><b>' +
               data.user + '</b>: ' + data.message + '</div>'
         }
      })
   </script>

   <body>
      <div id = "error-container"></div>
      <input id = "name" type = "text" name = "name" value = ""
         placeholder = "Enter your name!">
      <button type = "button" name = "button" onclick = "setUsername()">
         Let me chat!
      </button>
   </body>
</html>
Giờ ta sẽ thấy thông tin báo rằng username đã đăng ký rồi
SC username is taken! Try some other username.Khi bạn cung cấp username được phép thì sẽ được đưa tới message bõ và nút nhấn để gửi message. Vì chưa làm cái này nên sẽ bị stuck tại thông báo như trên do đó ta phải handle và dẫn message tới client được kết nối bằng cách điều chỉnh file app.js như sau
var app = require('express')();
var http = require('http').Server(app);
var io = require('socket.io')(http);

app.get('/', function(req, res) {
   res.sendFile(__dirname + '/index.html');
});

users = [];
io.on('connection', function(socket) {
   console.log('A user connected');
   socket.on('setUsername', function(data) {
      console.log(data);

      if(users.indexOf(data) > -1) {
         socket.emit('userExists', data + ' username is taken! Try some other username.');
      } else {
         users.push(data);
         socket.emit('userSet', {username: data});
      }
   });

   socket.on('msg', function(data) {
      //Send message to everyone
      io.sockets.emit('newmsg', data);
   })
});

http.listen(3000, function() {
   console.log('listening on localhost:3000');
});
Giờ thì kết nối thử 2 client vào server và chat thử xem sao, ta chọn 2 client là Tí và Tèo chat hello Tí hello Tèo xem thế nào thôi anh em
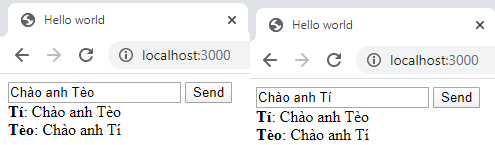
Log trên server
listening on localhost:3000
A user connected
A user connected
A user connected
Tí
A user connected
Tèo
Debug và Log
Theo trang chủ của socket.IO thì có một số cách debug cho chúng ta như sau
Cách ok nhất để xem thông tin có hay không là dùng *, thêm đoạn code sau vào trong file package.json
DEBUG=* node yourfile.jsNội dung của file sẽ giống như sau
{
"name": "helloworld",
"version": "1.0.0",
"description": "",
"main": "index.js",
"scripts": {
"start": "NODE_ENV=dev DEBUG=* node app.js"
},
"author": "SC",
"license": "ISC",
"dependencies": {
"express": "^4.17.1",
"socket.io": "^2.3.0"
}
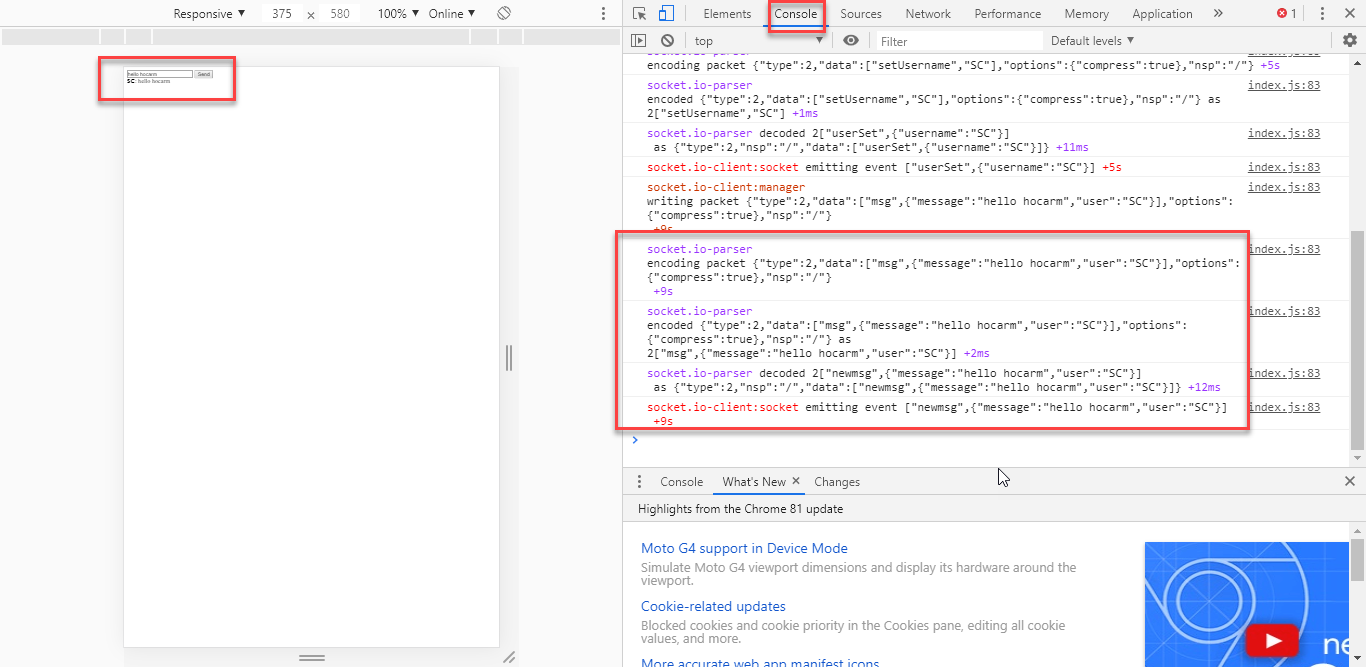
}Hoặc ta có thể debug trên trình duyệt(cách này thường hay được dùng nhất) bằng cách sau
- Chuột phải vào trang
localhost:3000trình duyệt chrome - Chọn Inspect element
- Chọn Console tab
- Gõ
localStorage.debug = '*';enter - F5 lại trang web
Để xem tất cả debug messages từ the engine và socket.io ta thay localStorage.debug = '*'; bằng localStorage.debug = 'engine,socket.io*';
Toàn bộ code của serie này anh em có thể tham khảo ở
 hocarm
Kết
Vậy là chúng ta đã hoàn thành tất cả các bài học trong series SocketIO rồi, các bạn đã hiểu được sơ bộ cơ bản về socketio, cách làm một ứng dụng với nó và cách để debug lấy thông tin. Coi như hoàn thành mức độ sơ cấp để đủ kiến thức trang bị cho phần tiếp theo đáng mong chờ hơn :D

