Làm thế nào để kết nối OLED với ESP8266 ? Trong bài viết này mình sẽ hướng dẫn các bạn keetts nối 2 loại OLED là SPI và I2C với ESP8266/NodeMCU.
Chém qua tí về OLED, hiển thị OLED không cần đèn nền, do đó có thể hiển thị được thông tin với độ tương phản tuyệt vời khi nhìn trong đêm tối. Thêm vào đó nữa là dùng OLED sẽ rất tiết kiệm năng lượng so với các màn hình hiển thị khác do các pixel chỉ tiêu thụ năng lượng khi nó được bật lên mà thôi.
OLED I2C
Loại OLED này sẽ có 4 chân kết nối thông qua chuẩn I2C
Kết nối
Ta có thể xem hình dưới đây
| Pin | ESP8266/NodeMCU |
|---|---|
| Vin | 3.3V |
| GND | GND |
| SCL | GPIO 5 (D1) |
| SDA | GPIO 4 (D2) |

Lập trình
Để lập trình hiển thị được OLED mình dùng 2 thư viện của Adafruit là: Adafruit_SSD1306 library và Adafruit_GFX library.
Ta có thể dùng luôn thư viện mẫu tại Arduino IDE, File > Examples > Adafruit SSD1306 và chọn sdd1306_128x64_i2c.
Chương trình mình copy luôn ở dưới đây
/*********
  Complete project details at https://randomnerdtutorials.com

  This is an example for our Monochrome OLEDs based on SSD1306 drivers. Pick one up today in the adafruit shop! ------> http://www.adafruit.com/category/63_98
  This example is for a 128x32 pixel display using I2C to communicate 3 pins are required to interface (two I2C and one reset).
  Adafruit invests time and resources providing this open source code, please support Adafruit and open-source hardware by purchasing products from Adafruit!
  Written by Limor Fried/Ladyada for Adafruit Industries, with contributions from the open source community. BSD license, check license.txt for more information All text above, and the splash screen below must be included in any redistribution.
*********/

#include <SPI.h>
#include <Wire.h>
#include <Adafruit_GFX.h>
#include <Adafruit_SSD1306.h>

#define SCREEN_WIDTH 128 // OLED display width, in pixels
#define SCREEN_HEIGHT 64 // OLED display height, in pixels

// Declaration for an SSD1306 display connected to I2C (SDA, SCL pins)
#define OLED_RESET     -1 // Reset pin # (or -1 if sharing Arduino reset pin)
Adafruit_SSD1306 display(SCREEN_WIDTH, SCREEN_HEIGHT, &Wire, OLED_RESET);

#define NUMFLAKES     10 // Number of snowflakes in the animation example

#define LOGO_HEIGHT   16
#define LOGO_WIDTH    16
static const unsigned char PROGMEM logo_bmp[] =
{ B00000000, B11000000,
  B00000001, B11000000,
  B00000001, B11000000,
  B00000011, B11100000,
  B11110011, B11100000,
  B11111110, B11111000,
  B01111110, B11111111,
  B00110011, B10011111,
  B00011111, B11111100,
  B00001101, B01110000,
  B00011011, B10100000,
  B00111111, B11100000,
  B00111111, B11110000,
  B01111100, B11110000,
  B01110000, B01110000,
  B00000000, B00110000 };

void setup() {
  Serial.begin(115200);

  // SSD1306_SWITCHCAPVCC = generate display voltage from 3.3V internally
  if(!display.begin(SSD1306_SWITCHCAPVCC, 0x3C)) {
    Serial.println(F("SSD1306 allocation failed"));
    for(;;); // Don't proceed, loop forever
  }

  // Show initial display buffer contents on the screen --
  // the library initializes this with an Adafruit splash screen.
  display.display();
  delay(2000); // Pause for 2 seconds

  // Clear the buffer
  display.clearDisplay();

  // Draw a single pixel in white
  display.drawPixel(10, 10, WHITE);

  // Show the display buffer on the screen. You MUST call display() after
  // drawing commands to make them visible on screen!
  display.display();
  delay(2000);
  // display.display() is NOT necessary after every single drawing command,
  // unless that's what you want...rather, you can batch up a bunch of
  // drawing operations and then update the screen all at once by calling
  // display.display(). These examples demonstrate both approaches...

  testdrawline();      // Draw many lines

  testdrawrect();      // Draw rectangles (outlines)

  testfillrect();      // Draw rectangles (filled)

  testdrawcircle();    // Draw circles (outlines)

  testfillcircle();    // Draw circles (filled)

  testdrawroundrect(); // Draw rounded rectangles (outlines)

  testfillroundrect(); // Draw rounded rectangles (filled)

  testdrawtriangle();  // Draw triangles (outlines)

  testfilltriangle();  // Draw triangles (filled)

  testdrawchar();      // Draw characters of the default font

  testdrawstyles();    // Draw 'stylized' characters

  testscrolltext();    // Draw scrolling text

  testdrawbitmap();    // Draw a small bitmap image

  // Invert and restore display, pausing in-between
  display.invertDisplay(true);
  delay(1000);
  display.invertDisplay(false);
  delay(1000);

  testanimate(logo_bmp, LOGO_WIDTH, LOGO_HEIGHT); // Animate bitmaps
}

void loop() {
}

void testdrawline() {
  int16_t i;

  display.clearDisplay(); // Clear display buffer

  for(i=0; i<display.width(); i+=4) {
    display.drawLine(0, 0, i, display.height()-1, WHITE);
    display.display(); // Update screen with each newly-drawn line
    delay(1);
  }
  for(i=0; i<display.height(); i+=4) {
    display.drawLine(0, 0, display.width()-1, i, WHITE);
    display.display();
    delay(1);
  }
  delay(250);

  display.clearDisplay();

  for(i=0; i<display.width(); i+=4) {
    display.drawLine(0, display.height()-1, i, 0, WHITE);
    display.display();
    delay(1);
  }
  for(i=display.height()-1; i>=0; i-=4) {
    display.drawLine(0, display.height()-1, display.width()-1, i, WHITE);
    display.display();
    delay(1);
  }
  delay(250);

  display.clearDisplay();

  for(i=display.width()-1; i>=0; i-=4) {
    display.drawLine(display.width()-1, display.height()-1, i, 0, WHITE);
    display.display();
    delay(1);
  }
  for(i=display.height()-1; i>=0; i-=4) {
    display.drawLine(display.width()-1, display.height()-1, 0, i, WHITE);
    display.display();
    delay(1);
  }
  delay(250);

  display.clearDisplay();

  for(i=0; i<display.height(); i+=4) {
    display.drawLine(display.width()-1, 0, 0, i, WHITE);
    display.display();
    delay(1);
  }
  for(i=0; i<display.width(); i+=4) {
    display.drawLine(display.width()-1, 0, i, display.height()-1, WHITE);
    display.display();
    delay(1);
  }

  delay(2000); // Pause for 2 seconds
}

void testdrawrect(void) {
  display.clearDisplay();

  for(int16_t i=0; i<display.height()/2; i+=2) {
    display.drawRect(i, i, display.width()-2*i, display.height()-2*i, WHITE);
    display.display(); // Update screen with each newly-drawn rectangle
    delay(1);
  }

  delay(2000);
}

void testfillrect(void) {
  display.clearDisplay();

  for(int16_t i=0; i<display.height()/2; i+=3) {
    // The INVERSE color is used so rectangles alternate white/black
    display.fillRect(i, i, display.width()-i*2, display.height()-i*2, INVERSE);
    display.display(); // Update screen with each newly-drawn rectangle
    delay(1);
  }

  delay(2000);
}

void testdrawcircle(void) {
  display.clearDisplay();

  for(int16_t i=0; i<max(display.width(),display.height())/2; i+=2) {
    display.drawCircle(display.width()/2, display.height()/2, i, WHITE);
    display.display();
    delay(1);
  }

  delay(2000);
}

void testfillcircle(void) {
  display.clearDisplay();

  for(int16_t i=max(display.width(),display.height())/2; i>0; i-=3) {
    // The INVERSE color is used so circles alternate white/black
    display.fillCircle(display.width() / 2, display.height() / 2, i, INVERSE);
    display.display(); // Update screen with each newly-drawn circle
    delay(1);
  }

  delay(2000);
}

void testdrawroundrect(void) {
  display.clearDisplay();

  for(int16_t i=0; i<display.height()/2-2; i+=2) {
    display.drawRoundRect(i, i, display.width()-2*i, display.height()-2*i,
      display.height()/4, WHITE);
    display.display();
    delay(1);
  }

  delay(2000);
}

void testfillroundrect(void) {
  display.clearDisplay();

  for(int16_t i=0; i<display.height()/2-2; i+=2) {
    // The INVERSE color is used so round-rects alternate white/black
    display.fillRoundRect(i, i, display.width()-2*i, display.height()-2*i,
      display.height()/4, INVERSE);
    display.display();
    delay(1);
  }

  delay(2000);
}

void testdrawtriangle(void) {
  display.clearDisplay();

  for(int16_t i=0; i<max(display.width(),display.height())/2; i+=5) {
    display.drawTriangle(
      display.width()/2  , display.height()/2-i,
      display.width()/2-i, display.height()/2+i,
      display.width()/2+i, display.height()/2+i, WHITE);
    display.display();
    delay(1);
  }

  delay(2000);
}

void testfilltriangle(void) {
  display.clearDisplay();

  for(int16_t i=max(display.width(),display.height())/2; i>0; i-=5) {
    // The INVERSE color is used so triangles alternate white/black
    display.fillTriangle(
      display.width()/2  , display.height()/2-i,
      display.width()/2-i, display.height()/2+i,
      display.width()/2+i, display.height()/2+i, INVERSE);
    display.display();
    delay(1);
  }

  delay(2000);
}

void testdrawchar(void) {
  display.clearDisplay();

  display.setTextSize(1);      // Normal 1:1 pixel scale
  display.setTextColor(WHITE); // Draw white text
  display.setCursor(0, 0);     // Start at top-left corner
  display.cp437(true);         // Use full 256 char 'Code Page 437' font

  // Not all the characters will fit on the display. This is normal.
  // Library will draw what it can and the rest will be clipped.
  for(int16_t i=0; i<256; i++) {
    if(i == '\n') display.write(' ');
    else          display.write(i);
  }

  display.display();
  delay(2000);
}

void testdrawstyles(void) {
  display.clearDisplay();

  display.setTextSize(1);             // Normal 1:1 pixel scale
  display.setTextColor(WHITE);        // Draw white text
  display.setCursor(0,0);             // Start at top-left corner
  display.println(F("Hello, world!"));

  display.setTextColor(BLACK, WHITE); // Draw 'inverse' text
  display.println(3.141592);

  display.setTextSize(2);             // Draw 2X-scale text
  display.setTextColor(WHITE);
  display.print(F("0x")); display.println(0xDEADBEEF, HEX);

  display.display();
  delay(2000);
}

void testscrolltext(void) {
  display.clearDisplay();

  display.setTextSize(2); // Draw 2X-scale text
  display.setTextColor(WHITE);
  display.setCursor(10, 0);
  display.println(F("scroll"));
  display.display();      // Show initial text
  delay(100);

  // Scroll in various directions, pausing in-between:
  display.startscrollright(0x00, 0x0F);
  delay(2000);
  display.stopscroll();
  delay(1000);
  display.startscrollleft(0x00, 0x0F);
  delay(2000);
  display.stopscroll();
  delay(1000);
  display.startscrolldiagright(0x00, 0x07);
  delay(2000);
  display.startscrolldiagleft(0x00, 0x07);
  delay(2000);
  display.stopscroll();
  delay(1000);
}

void testdrawbitmap(void) {
  display.clearDisplay();

  display.drawBitmap(
    (display.width()  - LOGO_WIDTH ) / 2,
    (display.height() - LOGO_HEIGHT) / 2,
    logo_bmp, LOGO_WIDTH, LOGO_HEIGHT, 1);
  display.display();
  delay(1000);
}

#define XPOS   0 // Indexes into the 'icons' array in function below
#define YPOS   1
#define DELTAY 2

void testanimate(const uint8_t *bitmap, uint8_t w, uint8_t h) {
  int8_t f, icons[NUMFLAKES][3];

  // Initialize 'snowflake' positions
  for(f=0; f< NUMFLAKES; f++) {
    icons[f][XPOS]   = random(1 - LOGO_WIDTH, display.width());
    icons[f][YPOS]   = -LOGO_HEIGHT;
    icons[f][DELTAY] = random(1, 6);
    Serial.print(F("x: "));
    Serial.print(icons[f][XPOS], DEC);
    Serial.print(F(" y: "));
    Serial.print(icons[f][YPOS], DEC);
    Serial.print(F(" dy: "));
    Serial.println(icons[f][DELTAY], DEC);
  }

  for(;;) { // Loop forever...
    display.clearDisplay(); // Clear the display buffer

    // Draw each snowflake:
    for(f=0; f< NUMFLAKES; f++) {
      display.drawBitmap(icons[f][XPOS], icons[f][YPOS], bitmap, w, h, WHITE);
    }

    display.display(); // Show the display buffer on the screen
    delay(200);        // Pause for 1/10 second

    // Then update coordinates of each flake...
    for(f=0; f< NUMFLAKES; f++) {
      icons[f][YPOS] += icons[f][DELTAY];
      // If snowflake is off the bottom of the screen...
      if (icons[f][YPOS] >= display.height()) {
        // Reinitialize to a random position, just off the top
        icons[f][XPOS]   = random(1 - LOGO_WIDTH, display.width());
        icons[f][YPOS]   = -LOGO_HEIGHT;
        icons[f][DELTAY] = random(1, 6);
      }
    }
  }
}
Nếu bạn không dùng chân RESET của OLED thì phải set biến OLED_RESET thành -1 như sau:
#define OLED_RESET -1 // Reset pin # (or -1 if sharing Arduino reset pin)Nếu OLED của bạn không show được gì thì cần kiểm tra:
- Kết nối của OLED và ESP8266/NodeMCU đã đủ chưa
- Kiểm tra địa chỉ I2C bằng cách dùng code sau I2C Scanner và xem trên serial monitor. Thông thường sẽ có địa chỉ là 0x3C bạn có thể thay đổi nó ở đoạn code dưới đây
if(!display.begin(SSD1306_SWITCHCAPVCC, 0x3C)) { OLED SPI
Về OLED LCD giao tiếp SPI thì được điều khiển với chip SH1106, con này thì cơ bản giống với SSD1306, sự khác biệt duy nhất là kích thước là 132×64 thay vì 128×64
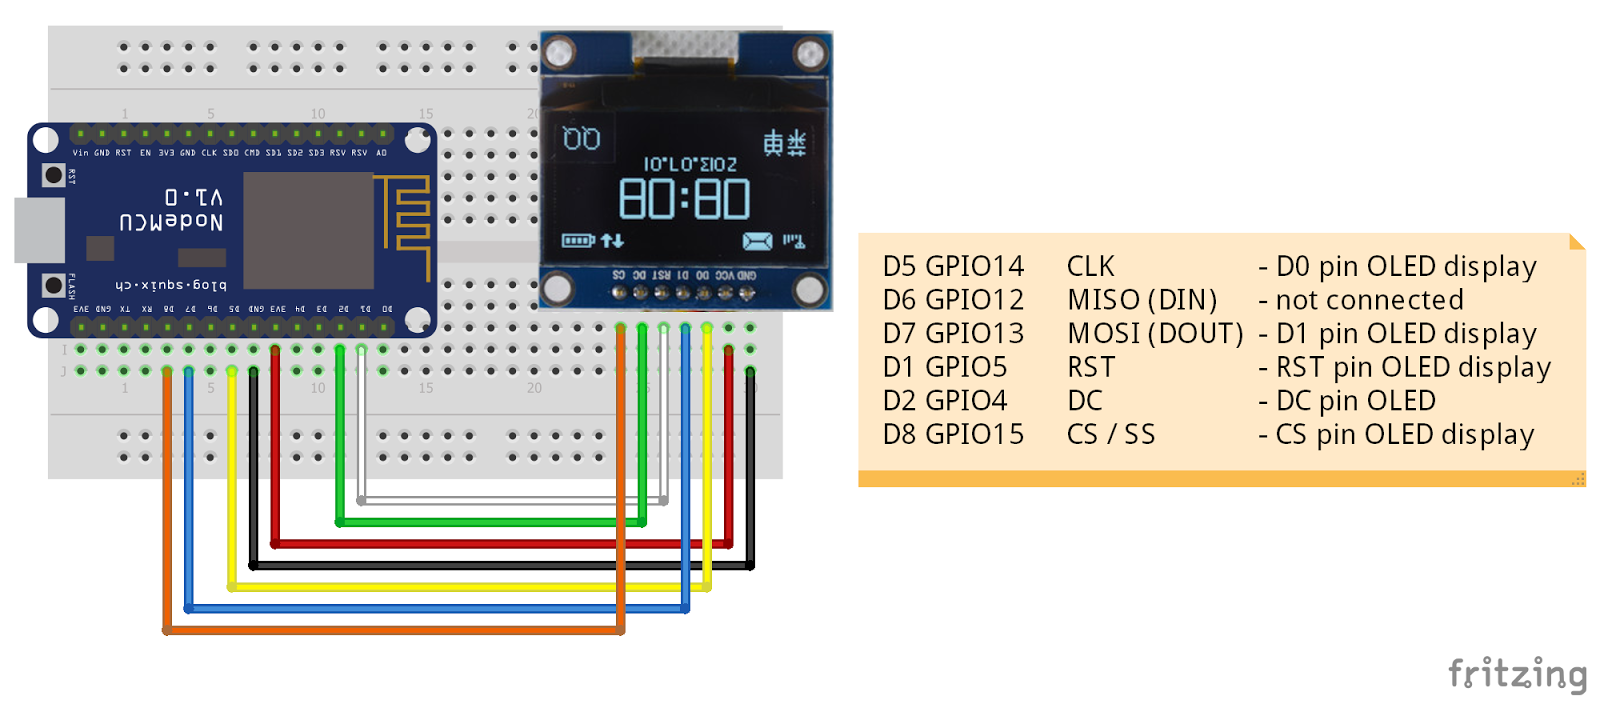
Kết nối
Kết nối của ESP8266 (nodeMCU) với OLED là khá đơn giản, các bạn có thể tham khảo hình dưới đây
Lập trình
Mình dùng Arduino cho ESP8266 với thư viện OLED SPI ở đây
Chương trình
/**The MIT License (MIT)
Copyright (c) 2016 by Rene-Martin Tudyka
Based on the SSD1306 OLED library Copyright (c) 2015 by Daniel Eichhorn (http://blog.squix.ch),
available at https://github.com/squix78/esp8266-oled-ssd1306
Permission is hereby granted, free of charge, to any person obtaining a copy
of this software and associated documentation files (the "Software"), to deal
in the Software without restriction, including without limitation the rights
to use, copy, modify, merge, publish, distribute, sublicense, and/or sell
copies of the Software, and to permit persons to whom the Software is
furnished to do so, subject to the following conditions:
The above copyright notice and this permission notice shall be included in all
copies or substantial portions of the Software.
THE SOFTWARE IS PROVIDED "AS IS", WITHOUT WARRANTY OF ANY KIND, EXPRESS OR
IMPLIED, INCLUDING BUT NOT LIMITED TO THE WARRANTIES OF MERCHANTABILITY,
FITNESS FOR A PARTICULAR PURPOSE AND NONINFRINGEMENT. IN NO EVENT SHALL THE
AUTHORS OR COPYRIGHT HOLDERS BE LIABLE FOR ANY CLAIM, DAMAGES OR OTHER
LIABILITY, WHETHER IN AN ACTION OF CONTRACT, TORT OR OTHERWISE, ARISING FROM,
OUT OF OR IN CONNECTION WITH THE SOFTWARE OR THE USE OR OTHER DEALINGS IN THE
SOFTWARE.
See more at http://blog.squix.ch
Connect
ESP8266     | OLED SPI
-----------------------
D5 (GPIO14) | D0 (CLK)
D6 (GPIO12) | -
D7 (GPIO13) | D1(MOSI)
D1 (GPIO5)  | RST
D2 (GPIO4)  | DC
D8 (GPIO15) | CS
*/
#include <Wire.h>
#include <SPI.h>
#include "SH1106.h"
#include "SH1106Ui.h"
#include "images.h"

// Pin definitions for I2C
//#define OLED_SDA    D2  // pin 14
//#define OLED_SDC    D4  // pin 12
//#define OLED_ADDR   0x3C

/* Hardware Wemos D1 mini SPI pins
 D5 GPIO14   CLK         - D0 pin OLED display
 D6 GPIO12   MISO (DIN)  - not connected
 D7 GPIO13   MOSI (DOUT) - D1 pin OLED display
 D1 GPIO5    RST         - RST pin OLED display
 D2 GPIO4    DC          - DC pin OLED
 D8 GPIO15   CS / SS     - CS pin OLED display
*/

// Pin definitions for SPI
// ESP8266
//#define OLED_RESET  5   // RESET
//#define OLED_DC     4   // Data/Command
//#define OLED_CS     15  // Chip select
// Node MCU
#define OLED_RESET  D1   // RESET
#define OLED_DC     D2   // Data/Command
#define OLED_CS     D8   // Chip select

// Uncomment one of the following based on OLED type
SH1106 display(true, OLED_RESET, OLED_DC, OLED_CS); // FOR SPI
//SH1106   display(OLED_ADDR, OLED_SDA, OLED_SDC);    // For I2C
SH1106Ui ui     ( &display );

bool msOverlay(SH1106 *display, SH1106UiState* state) {
  display->setTextAlignment(TEXT_ALIGN_RIGHT);
  display->setFont(ArialMT_Plain_10);
  display->drawString(128, 0, String(millis()));
  return true;
}

bool drawFrame1(SH1106 *display, SH1106UiState* state, int x, int y) {
  // draw an xbm image.
  // Please note that everything that should be transitioned
  // needs to be drawn relative to x and y

  // if this frame need to be refreshed at the targetFPS you need to
  // return true
  display->drawXbm(x + 34, y + 14, WiFi_Logo_width, WiFi_Logo_height, WiFi_Logo_bits);
  return false;
}

bool drawFrame2(SH1106 *display, SH1106UiState* state, int x, int y) {
  // Demonstrates the 3 included default sizes. The fonts come from SH1106Fonts.h file
  // Besides the default fonts there will be a program to convert TrueType fonts into this format
  display->setTextAlignment(TEXT_ALIGN_LEFT);
  display->setFont(ArialMT_Plain_10);
  display->drawString(0 + x, 10 + y, "Arial 10");

  display->setFont(ArialMT_Plain_16);
  display->drawString(0 + x, 20 + y, "Arial 16");

  display->setFont(ArialMT_Plain_24);
  display->drawString(0 + x, 34 + y, "Arial 24");

  return false;
}

bool drawFrame3(SH1106 *display, SH1106UiState* state, int x, int y) {
  // Text alignment demo
  display->setFont(ArialMT_Plain_10);

  // The coordinates define the left starting point of the text
  display->setTextAlignment(TEXT_ALIGN_LEFT);
  display->drawString(0 + x, 11 + y, "Left aligned (0,10)");

  // The coordinates define the center of the text
  display->setTextAlignment(TEXT_ALIGN_CENTER);
  display->drawString(64 + x, 22, "Center aligned (64,22)");

  // The coordinates define the right end of the text
  display->setTextAlignment(TEXT_ALIGN_RIGHT);
  display->drawString(128 + x, 33, "Right aligned (128,33)");
  return false;
}

bool drawFrame4(SH1106 *display, SH1106UiState* state, int x, int y) {
  // Demo for drawStringMaxWidth:
  // with the third parameter you can define the width after which words will be wrapped.
  // Currently only spaces and "-" are allowed for wrapping
  display->setTextAlignment(TEXT_ALIGN_LEFT);
  display->setFont(ArialMT_Plain_10);
  display->drawStringMaxWidth(0 + x, 10 + y, 128, "Lorem ipsum dolor sit amet, consetetur sadipscing elitr, sed diam nonumy eirmod tempor invidunt ut labore.");
  return false;
}

// how many frames are there?
int frameCount = 4;
// this array keeps function pointers to all frames
// frames are the single views that slide from right to left
bool (*frames[])(SH1106 *display, SH1106UiState* state, int x, int y) = { drawFrame1, drawFrame2, drawFrame3, drawFrame4 };

bool (*overlays[])(SH1106 *display, SH1106UiState* state)             = { msOverlay };
int overlaysCount = 1;

void setup() {
  Serial.begin(115200);
  Serial.println();
  Serial.println();


  ui.setTargetFPS(30);

  ui.setActiveSymbole(activeSymbole);
  ui.setInactiveSymbole(inactiveSymbole);

  // You can change this to
  // TOP, LEFT, BOTTOM, RIGHT
  ui.setIndicatorPosition(BOTTOM);

  // Defines where the first frame is located in the bar.
  ui.setIndicatorDirection(LEFT_RIGHT);

  // You can change the transition that is used
  // SLIDE_LEFT, SLIDE_RIGHT, SLIDE_TOP, SLIDE_DOWN
  ui.setFrameAnimation(SLIDE_LEFT);

  // Add frames
  ui.setFrames(frames, frameCount);

  // Add overlays
  ui.setOverlays(overlays, overlaysCount);

  // Inital UI takes care of initalising the display too.
  ui.init();

  //display.flipScreenVertically();

}

void loop() {
  int remainingTimeBudget = ui.update();

  if (remainingTimeBudget > 0) {
    // You can do some work here
    // Don't do stuff if you are below your
    // time budget.
    delay(remainingTimeBudget);
  }
}
DIY
Nếu bạn muốn làm một mạch riêng thì có thể tham khảo anh bạn dưới đây. Ở đây anh ta thiết kế một mạch đơn giản, không có nút nhấn, không cảm biến, chỉ có duy nhất một cổng USB để kết nối nguồn và nạp chương trình xuống, thêm một số thành phần khác như nguồn, thẻ nhớ,…
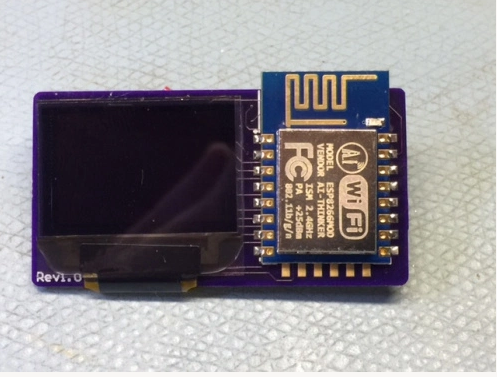
Tất cả schematic và source code bạn có thể tham khảo tại
Source OLED ESP8266
 mike-rankin
Tạm kết
Bài viết đơn giản ngắn gọn về kết nối và lập trình hiển thị OLED I2C và SPI với ESP8266/NodeMCU, vậy là mình đã có thể thực hiện được việc hiển thị một cách nhanh nhất thông tin lên OLED rồi.
