SocketIO là gì ? Cách lập trình SocketIO với nodejs mình đã nói ở series bài viết về SocketIO, hôm nay mình sẽ thực hiện một kết nối realtime giữa server với ESP8266/NodeMCU(client), việc này sẽ rất hữu dụng khi server cần thông báo một cái gì đó cho client. Mời anh chị em cùng xem
Trước tiên khi bắt đầu nếu mọi người chưa quen với socketIO có thể dành 15p để thực hành series bài viết bên dưới


Tạo Server socketIO nodejs
Chúng ta cần tạo một server Node và tích hợp SocketIO vào. Trong trường hợp này mình giả sử là bạn đã biết tạo một project với nodeJS rồi nhé.
Trong server chúng ta sẽ sử dụng một framework là express để kết nối HTTP request, sau đó tích hợp socket.io để lắng nghe các event được định nghĩa
Có các dependencies được cài đặt là
  "dependencies": {
    "express": "^4.17.1",
    "socket.io": "^2.3.0"
  }
Để cài đặt ta dùng 1 trong 2 lệnh dưới đây
npm install
yarn install
Cấu hình Node.js Server
Ta tạo file có tên server.js hoặc tên nào đó tùy sở thích của bạn.
Trong file này thì cần có express và socketIO
// express framework for a basic http server
var app = require('express')();
// create the http server
var http = require('http').createServer(app);
// require the socket.io and bind it to a port 3000
var io = require('socket.io')(3000);
Ta attach biến socket.io với HTTP server
io.attach(http, {
 pingInterval: 10000,
 pingTimeout: 5000,
 cookie: false
});
Lắng nghe Event trên Socket.io
Ta cần phải lắng nghe các event và log thông tin ra debug, timeout là hàm emit mỗi event sau 5s
io.on('connection', function (socket) {

  console.log('user connected');

  socket.on('disconnect', function () {
    console.log('user disconnected');
  });
  socket.on('message', function (msg) {
   console.log("message: "+msg);
  });
  timeout();
});

function timeout() {
  setTimeout(function () {
   io.emit('reply',"A message from server");
    timeout();
  }, 5000);
}
Cuối cùng là lắng nghe trên HTTP server bởi đoạn code
http.listen();Server sẽ lắng nghe trên port 3000 do mình định nghĩa, các bạn có thể thay bằng số bất kỳ để không bị trùng port. Giờ thì coi như việc code cho server đã hoàn thành
Chương trình full
var app = require('express')();
//var http = require('http').Server(app);
var http = require('http').createServer(app);
//var io = require('socket.io')(http);
var io = require('socket.io')(3000);

io.attach(http, {
 pingInterval: 10000,
 pingTimeout: 5000,
 cookie: false
});

//Whenever someone connects this gets executed
io.on('connection', function(socket) {
   console.log('A user connected');

   //Whenever someone disconnects this piece of code executed
   socket.on('disconnect', function () {
      console.log('A user disconnected');
   });
   socket.on('message', function (msg) {
   console.log("message: "+msg);
   });
   timeout();
});
function timeout() {
  setTimeout(function () {
   io.emit('reply',"A message from server");
    timeout();
  }, 5000);
}
http.listen();
Tạo client với ESP8266/NodeMCU
ESP8266 thì quá quen thuộc với anh em rồi, mình đi vào code luôn nhỉ
Lập trình Socket.io Client trên NodeMCU
Chúng ta cần có thư viện SocketIoClient, ở trên mạng nhiều bài hướng dẫn là sử dụng version cũ 0.1 rồi nên tải về sẽ bị lỗi, ở hướng dẫn này mình dùng bản final luôn v0.3 nha anh em, xài ok ngon lành cành mít.
Ta thêm thư viện và tạo ra biến global với đoạn code sau
#include <SocketIoClient.h>
SocketIoClient webSocket;
Sau đó cần kết nối với địa chỉ IP của server(ở đây là địa chỉ PC của mình), bạn có thể check ip bằng lệnh ipconfig với cmd
Cuối cùng là lắng nghe các event từ server và emit event khi cần.
  webSocket.on("reply", messageEvenetHandler);
  webSocket.begin("192.168.1.150", 3000);
Với messageEvent handler là hàm
void messageEvenetHandler(const char * payload, size_t length) {
  USE_SERIAL.printf("got message: %s\n", payload);
}
Sau khi lắng nghe thì chúng ta cần gọi hàm loop của socketio client và emit thông tin từ server gửi xuống với đoạn code sau
  webSocket.loop();
  uint64_t now = millis();
  if (now - messageTimestamp > 6000) {
    messageTimestamp = now;
    // Send event
    webSocket.emit("message", "\"this is a message from the client\"");
  }
Chương trình full cho ESP Client
#include <Arduino.h>
#include <ESP8266WiFi.h>
#include <ESP8266WiFiMulti.h>
#include <SocketIoClient.h>
#define USE_SERIAL Serial
ESP8266WiFiMulti WiFiMulti;
SocketIoClient webSocket;
void messageEvenetHandler(const char * payload, size_t length) {
USE_SERIAL.printf("got message: %s\n", payload);
}
void setup() {
USE_SERIAL.begin(115200);
USE_SERIAL.setDebugOutput(true);
USE_SERIAL.println();
USE_SERIAL.println();
USE_SERIAL.println();
for (uint8_t t = 4; t > 0; t--) {
USE_SERIAL.printf("[SETUP] BOOT WAIT %d...\n", t);
USE_SERIAL.flush();
delay(1000);
}
WiFiMulti.addAP("SCKT", "Huhuhu123");
while (WiFiMulti.run() != WL_CONNECTED) {
delay(100);
}
webSocket.on("reply", messageEvenetHandler);
webSocket.begin("192.168.1.150", 3000);
// use HTTP Basic Authorization this is optional remove if not needed
//webSocket.setAuthorization("username", "password");
}
uint64_t messageTimestamp;
void loop() {
webSocket.loop();
uint64_t now = millis();
if (now - messageTimestamp > 6000) {
messageTimestamp = now;
// Send event
webSocket.emit("message", "\"this is a message from the client\"");
}
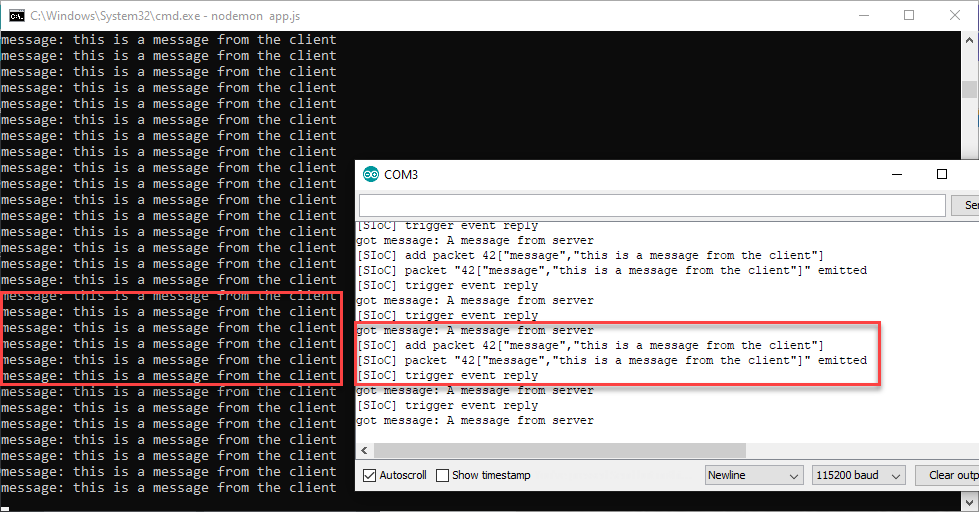
}Kết quả
Nếu ra kết quả như sau là bạn đã thành công rồi đó
Toàn bộ chương trình bạn có thể tham khảo thêm ở
 hocarm
Tạm kết
Vậy là bạn đã có thể tạo server với SocketIO và sử dụng ESP8266/NodeMCU như một Client gửi data lên server thông qua socketIO với thời gian thực, đây là bước cơ bản để bạn có thể xây dựng được một hệ thống IOT của riêng mình rồi.


